Monday, February 28, 2011

Meal Plan – Feb 28

I decided to treat myself again with some flowers this week. 

Meal Plan – Feb 28

Monday
B:  Bagel Thin with cream cheese (170), a cheese stick (80) and grapes (55), plus coffee with creamer (35) (=340)
L:  Tuna salad with crackers and orange slices
D:  Beef and Gravy*, with mashed potatoes and broccoli/cauliflower

Tuesday
B:  Boiled egg (70) Toast (90) with honey (60), grapes (55), plus coffee with creamer (35) (=310)
L:  Ham and cheese sandwich (230), pringles (100), and a plum (35) (=365)
D:  Omelet with toast.

Wednesday
B:  Peanut butter (90) and banana (100ish) sandwich (45), with homemade apple sauce (85), plus coffee with creamer (35) (=355).
L:  Cabbage & Turkey soup*
D:  Cheese stuffed shells** with sauce, sautéed cabbage and cucumber/tomato/avocado salad

Thursday
B:  Bagel Thin (110) with ham (60) and cheese (80) and orange slices (50), plus coffee with creamer (35) (=335).
L:  Bacon ranch chicken* salad
D:  Taco chicken breasts** with corn/tomato/avocado salad and carrots

Friday
B:  Breakfast burrito* (180ish) with yogurt (80), with plum (35ish), plus coffee with creamer (35) (=330).
L:  Leaving open for now.
D:  Turkey meatloaf* with mashed potatoes* and broccoli/cauliflower


*   In the freezer, cooked
** In the freezer, needs cooking

The numbers in ( ) are my calories counts.  Because of my calorie needs for the size I want to be at I try to keep my meals between 300-400 calories. 

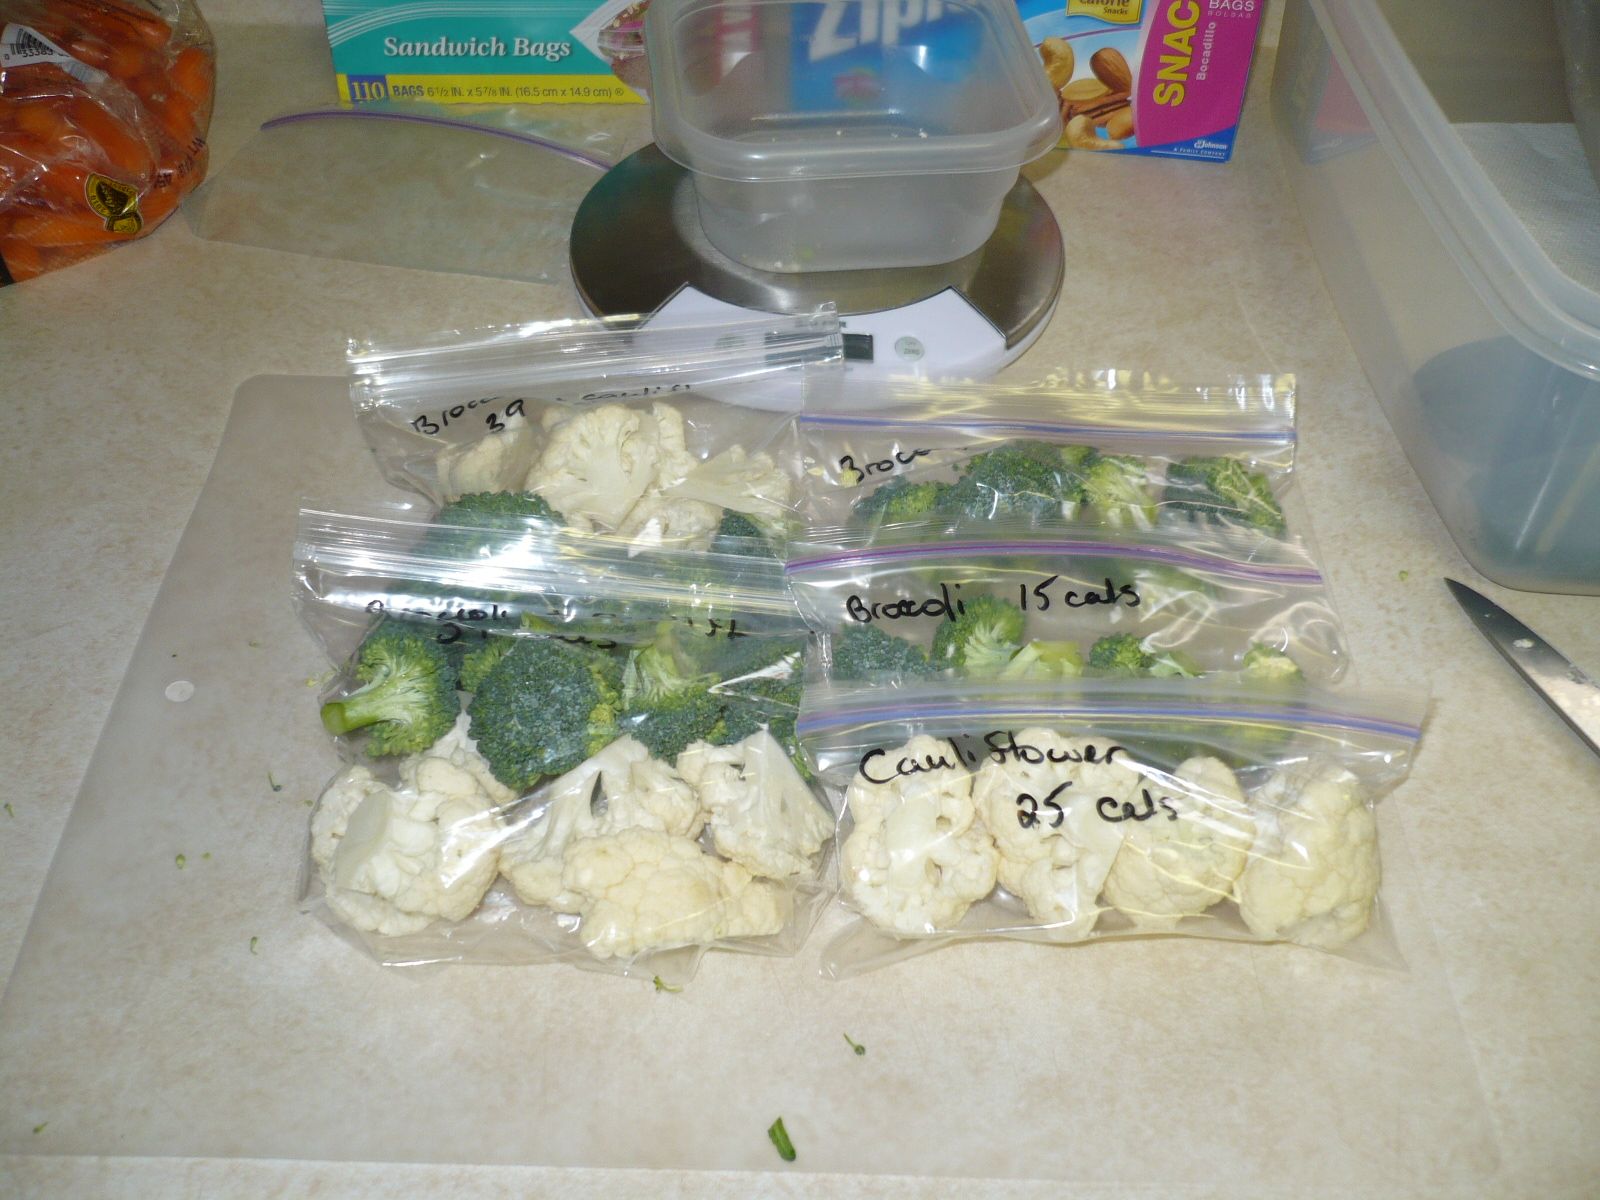
I started with breakfast because those are the ones I can figure the easiest.  From this point forward my plan is to start a calorie tally as I am making things to put in the freezer.  It takes a little work, but in the end it is worth it for me.

Check out my tips on prepping veggies for healthy/single girl cooking!  If you are cooking for a family, still check it out, you might pick up a tip as well.

And don’t forget to check out OrgJunkie.com for other great meal plan ideas.


Cooking Tip # 4: Veggie Prep

Single Girl *Healthy* Cooking Tip # 4:  Veggie Prep

As a single girl that is trying to get back in the habit of eating healthy I took some time out yesterday and did a veggie prep with most of what was in my fridge.  I have found that I am more likely to eat veggies if it doesn’t take long for me to get them from the fridge to the cookie vessel I am using, which means less wasted/rotten veggies in the long run. 

If you stumbled on to this page, but have a bigger family to feed you can still do the same prep all you have to do is bag your portions bigger.  The smaller bags would be great for kid’s lunches or snacks in a hurry.

For me, this isn’t just about bagging, but also portion size and calorie counts.  If that isn’t a concern for you, you can skip the weighting part and just go straight to bagging up your ‘serving’ sizes.

The prep:


Plastic bags – sandwich and snack size
Scale (or you can use measuring cups)
Calculator
Marker
Piece of paper for notes
Cutting board and knife

Next up:


The veggies and fruits!

Grapes:


Using the List of Veggies/Fruits I found online I weighted out ‘serving sizes’ of grapes and marked the bag with the calorie counts.  That way later on when I am cooking/eating it makes it quicker to tally up calories.

On the chart above, they only have green grapes so I did use those numbers.  I figure it is close enough to give me an idea.  I don’t try to get the weight to the exact gram, usually staying under just a little bit.  I will also round calorie numbers up sometimes.

Broccoli and Cauliflower:


For this I will do smaller bags of them as well as bags that mix and match.

Cabbage:


This is where that calculator comes in handy.  For the cabbage I did some double serving bags, which still only added up to 35 calories, as well as single serving bags, 17 calories.  When I was done I had an amount that was odd, so I divided it up and ended up with two 22 calorie serving bags.

Oranges:


Here is that calculator math for you…
My one peeled orange weighted 204g.
I divided the 204g by 131g (which is a typical serving weight) and got 1.56.  This would be about one and a half servings for the orange.
I multiplied the 1.56 by 62, (which is how many calories for the typical serving) and got 96.72.
I decided I wanted two ‘servings’ of oranges, so I divided then 96.72 by 2 and got 48.36.
I divided the orange slices into two bags, and rounded up, labeling them at 50 calories per serving. 

I did this math a lot, in the past, for fruits if I didn’t want the whole thing, or if I did want the whole thing I could figure out how many calories was in it.  Oranges or apples are rarely the exact serving size weight.  And of course it works well for things like the odd amount of cabbage like above.

Bags of everything:


I use both the snack and sandwich size depending on how big of a bag I need.  Here is everything I ended up with, minus the oranges. 
In right over an hour I cut up and portioned 8 bags of fruit and 18 bags of veggies, not to mention the prep, clean up and picture taking.

Into the fridge it goes:


I took all my bags of veggies and put them in a plastic container in the fridge.  This way they all stay together, and I can go shopping and pull out what I need. 

There are things I don’t precut, like cucumber, because I don’t like the texture of it after it sits cut for a few days. There are also stuff like lettuce that, to me, ‘goes off’ faster when cut up.

And the clean up:


I kept one of the veggie bags out and stuffed all the ‘trash’ into it as I worked.  When I was done I just had two bowls, cutting board and knife to wash, which was done in less than 5 mins.

I'm going to link this up over at We Are That Family for Works For Me Wednesdays.

Friday, February 25, 2011

Where did February go?

I know that Monday is officially the last day of the month, but I can’t help but wonder where in the world the month went?  Can you believe that we are just about to cross off the second month of the New Year?  If this keeps up, it will be the end of the year before we know it.

While I am happy with my efforts for decluttering, letting go and organizing things so far this year, I know I just need to work harder on my daily/weekly routine.  I did awesome for a week with my original list, and then completely dropped the ball when I added to the list.  It had nothing to do with adding to the list, I’m sure a lot of it came about because I was focused in on painting the dining room, but that really is only an excuse.  Life happens and life goes on, and I can’t completely forget everything I’ve worked towards just because something else comes up.

So while entering this new week and new month, I will refocus my attention back to my routines.  I also plan to crack down on eating better so that I can lose weight again.  I know what I need to do to lose weight.  I know that it isn’t uber hard to lose weight.  Don’t get me wrong it does take work, but it is achievable.  And I know I can do it, since I have before.  This time I just have to stick with it, and keep it up.  But as I said in another post, this is the year of me, and I feel good about this year.

My weekend plans…

Tonight I plan to finish up painting the trim in the dining room, and cleaning up the mess in there.  I can’t wait to see the floor and the paint together! 

I will also sit down and start working on my meal plan, including calorie counts for breakfast and other meals that I can figure them for. 

Make my grocery list, go through coupons and go to the grocery store.  I haven’t been to the store since the 12th.  At the moment I don’t have a big list, but I do have some of the more expensive items on my list.

Do food prep for the week.

Maybe work on a small decorating project or two.

And relax a little!  After last weekend I have decided I need a little scheduled down time.  I do plan to get things done, but that doesn’t mean I have to be busy every second of the weekend either.

Here is hoping everyone has a productive and relaxing weekend! 

The Dining Room: A Quick Peak

I week ago, I posted about my Dining Room, and the clean slate I was started with.  I’m happy to say that Saturday I did have some moments while painting when I was really enjoying myself.  I loved the color blue I had chosen and that just left me feeling happy.  Of course after two long days which ended in very late nights, and paint that wanted to stick to tape rather than the wall, I was pretty much done in Sunday night when I feel into bed after .

I really wanted to move the furniture in today and spend the weekend filling the curio and china cabinets.  Unfortunately because I haven’t been able to check everything off my list, I’m not ready for that yet.  I think after the late nights last weekend, followed by a sore back and working during the day, I misplaced my motivation.

A quick peak at a before:


This is what a girl does late at night when she is running out of primer but hopes to get the top color at least started before going to bed.  Unfortunately, I had the slowest drying paint last weekend, and I went to bed with the walls looking like this.


And this is where I am now.  My Balmy & Leisure Blue on the wall, separated by my pretty chair railing, which will get its final coat of paint tonight.


Before this time next week I hope to have pictures that actually have furniture in them.  But since my before pictures didn’t and because I am proud of what I have done to this point I am linking up over at A Bowl Full of Lemons to share my progess so far.

Tuesday, February 22, 2011

Meal Plan – Feb 21

Monday
B:  Bagel Thin with cream cheese and a cheese stick.
D:  Perogies* and a salad

Tuesday
B:  Bagel Thin with cream cheese, a cheese stick, and grapes
D:  Cabbage & Turkey soup*

Wednesday
B:  Toast with honey, yogurt and grapes
D:  Salisbury Streak* with Mac&Cheese* and veggie

Thursday
B:  Bagel Thin with Ham and Cheese and grapes
D:  Tilapia** with squash casserole** and veggie

Friday
B:  Breakfast burrito* with yogurt/grapes
D:  Beef & Gravy* with rice* and veggie

*   In the freezer, cooked
** In the freezer, needs cooking

Because of some things that came up, I moved things from last week on to this week’s menu.  Since it is all in the freezer, it isn’t a big deal.

I left out the lunch portion this week, but will add that back in next week and work harder to stick to it.  Starting next week, as well, I will be focusing more on calorie counting and eating healthier again.   

Linking again to http://orgjunkie.com/.  Check out the many menu plans there for ideas.


If you cook for one or two people, check out my 'Single Girl Cooking Tips' that I blogged about last week.

Monday, February 21, 2011

The Dining Room: Work in Progress

My main focus this weekend was painting the Dining Room.  Only problem was that while I was focused on that room, I totally let my daily items I had been working on slide.  I’m not going to let it get to me though, since I know I’ll get back on track.

Not to mention that this weekend I did:

  1. Worked once again on priming the paneling.  Was running out of primer so I did the top two thirds of the room. (Friday)

  1. Went to the paint store to buy more primer, went to the lumber store to pick out chair railing, and went to get my brother’s breakfast (Saturday)

  1. Started from the beginning on priming the wall my brother had to replace the paneling on. (Saturday.)  I also primed the bottom half of the room.

  1. Cut in and painted the two coats of my top color. (Saturday)

  1. Marked and taped off where the chair railing would be going.  Taped off the baseboard. (Sunday)

  1. Painted two coats of white on the chair railing molding. (Sunday)

  1. Painted two coats of primer and a coat of white on the trim for the door way. (Sunday)

  1. Painted two coat of white on the crown molding.  (Sunday)

  1. Cut in and painted the two coats of my bottom color. (Sunday)

  1. Spent at least 45 minutes cussing while trying to remove the tape from the baseboards.  Ended up having to go around with a knife before I could pull the tape and still had to make a dozen repairs. (Sunday night at about 12:30 am)

  1. I also washed my sheets and blankets and was putting them back on the bed at so I could fall into bed and get some sleep.

The paint dried at a snail’s pace this weekend, and I think that was part of the issue with the baseboard tape, since the tape I put down for the crown molding worked perfect.  Oh and the top section of the bottom coat that I taped off, that would be hidden under the chair railing?  It came off perfectly.  Go figure!

For some reason in my head I keep thinking that I only have a few things to do and the room will be done.  When I start laying it all out though, those few things seem to really add up.

  1. Paint the trim and baseboards.

  1. Put a quick coat of paint on the chair railing after my brother installs it for me.  Hoping he caulks it too.

  1. Decide which color I am painting the ledge between the kitchen and dining room.

  1. Pull up the cardboard and tape from the floor.

  1. Sweep the floor.

  1. Beg the guys to move the furniture into the room for me.

  1. Decide how many leafs I want to put in the table and where I will store them if I don’t.

  1. Put the dishes in the china cabinet and decide what will go in the curio.

  1. Hang the mirror.

  1. Wait for Momma to sew the curtains and valance.  Then recover the chair cushions.

  1. Figure out what decorations will be going in the room.  Guess it is time to start looking for ideas there.

I’ll be totally happy if I can get 1-9 of those done by this time next week.  Nine and ten will come in time, and I’m okay with that.

I also need to make my menu plan, decide if I am going to the grocery store this week, catch up on dishes plus other daily/weekly items, and wash clothes.

Right now the list seems never ending...

Friday, February 18, 2011

The Dining Room: A Blank Slate

 I’m really enjoying the whole painting the different rooms in my house thing.  Okay, well to be honest I hate everything between deciding you want to paint up too the pulling off the last bit of tape.  Maybe hate is a strong word, we will go with strongly dislike.  But to me all the steps involved with painting are just necessary evils of wanting a change.  Seeing how I can’t afford to hire someone else to do it, I just have to suck it up, and do it.

I will say that I hate caulking with a passion!  I’m sure it is mostly because I don’t really know what I am doing and I get it all over my hands and that stuff just doesn’t wash off easily.  If it wasn’t for that, I might actually, sort of be able to, get into one of those relaxed, enjoyable states of mind while paining.

I do however enjoy the end result, and I know that because I did it myself I can take some pride in that, as long as you don’t look too closely.

I like the time right before you start the project.  You know when the room is cleaned out and it is just a blank slate waiting for you to put your mark on it?  You get to just stand back with ideas and plans going through your head.  This is what I got to stand back and look at last week…


When I decided that I would be painting the room I headed to the fabric store to get some ideas of what I would want for curtains in the room.  I knew I also wanted to recover the dining room chairs so I decided making my own curtains would be easier than buying ready made them trying to match that to fabric for the chairs.  Well let me clarify, I don’t sew, but my momma does and she got volunteered to make curtains.

While there were a few fabrics that caught my eye while looking one stood out at me and I kept thinking about it all the way home, and the next day.  I knew then that it was the one I wanted.  I lucked out because when I went back to buy it I found it was 50% off, which was a great thing, because I wouldn’t have been able to afford it other wise.


With the fabric in hand I had to do the fun thing of picking out colors.  Maybe it’s the too many colors to pick from or that I’m afraid I’ll pick the wrong color, but this is one of the hardest things for me.  I’m working on reminding myself as long as I am happy, who cares, and trying to avoid everything being super matchy matchy.

Meet my colors:


(I had intended to open the cans and take a picture, but I kept forgetting, so this above will have to work for now.)

The only thing I know for sure that is going in this room is a mirror I pulled out of the middle bedroom.  It was one of those clearance buys.  Something I bought really cheap and thought I’d have a place for it one day.  We shall see if that day has come. 


I want an elegant room, especially with the furniture, so I’ll be on the hunt to see what I can find that fits with that.

Stayed tuned!  In the near future I will have more pictures of this project to share.

Wednesday, February 16, 2011

Hello Color!

I’m in a good mood today and felt like writing.  I don’t really have anything on my ‘to do’ list tonight, except for some personal plans, and I’m currently keeping those, well personal.  So I thought this would be a good time to back track and share a little more about my January.

I have dubbed the year 2011 as the *Year of Me*.  This is my year to make the changes in my life that are much needed. 

Some of my personal goals for the year are:

To finish losing weight, and keep it off
Decluttering and organizing my house (and life)
Set up daily/weekly routines so that I can keep my house clean and organized
Spend less and save more

Forty seven days into the year and I already feel better than I have in a long time.  While I haven’t really focused in on the weight loss aspects yet, I have been working on others.  I feel like this year, will be a good year for me.  I’m going to do what I can to make it that way.

It is amazing how life changes and things sometimes move very fast.  On the 6th of January I was told that I needed to have at least a part of my house ready to put down new floors.  When were they going to start on the floors?  The 10th!  Nothing like a deadline to get you jump started huh?  But I know from past experiences that I do work better with a deadline, as I tend to get more done right then and there.  Since the first of January my attention has been focused on my house, which it needed to be, so that is a bonus.

During the floor removal I decided to paint the two bedrooms.  I’ve been ready for a change in my bedroom, so I decided to go all out by replacing the bedding and curtains and paint while I was at it.  After some thought I decided to go bold, and bold I went.  The paint color I choose for my bedroom was Really Red.  And yes, it really is red.  I love it, though those around me just kind of shake their head or talk about it’s glowing properties.


The room is far from done since I still need to paint the furniture and put it all back together.  I’m excited about it, especially when I start thinking about decorating ideas.  I want to attempt some art work for one wall, and I do mean attempt so I’m not an artist.  And I already bought a vase and flowers to go in the corner.


It is one of my works in progress.  Another work in progress would be the other bedroom.  For my extra bedroom I decided on Fun Yellow.  I’m happy with this color choice as well, and am accenting it with blues.  The furniture has been moved back into the room, which is more than I can say about my bedroom.  I do have plans to pull the bench back out and paint it a blue to match the curtains I bought, plus I need to hang some decorations as well as find some other ones. 


The previous theme in the room was a sea/beach/water theme and I went a little over board with it.  I found a bunch of different cute things I bought over a period of time then realized it was probably too much and didn’t exactly match together.  Since it was all already bought I used them anyway.  When I started cleaning the room out I had no problem getting rid of some things, but other things, like the shells, I had I wanted to keep and find another use for.  I’m working on editing my ideas and staying more simplistic.  Instead of having 10 small random bowls of shells I decided I would condense it down.  This is what I came up with.


I’m working on some ideas for both bedrooms to utilize things I have in other rooms that do not match those rooms any more.  As I said in the post about the craft chest, I’m not a big think outside the box kind of person.  It actually feels a little funny to me to paint something that is perfectly fine as is.  But I am going to work past those feeling and just do it, because I’d rather paint and reuse items I like, but don’t necessarily fit into the new rooms.  I know in the end I will probably love it more, and it saves me money from having to go out and buy all new decorations.

It is amazing to think back on the last 6 weeks to see how much I have accomplished in that short span of time.  I still have many projects, both big and small on my every growing ‘to do’ list, but it feels good to know that I have checked several things off already.

I am a firm believer that it isn’t only the before and after that matters, but the journey it takes to get you there.  I am very much looking forward to my journey this year, and am excited to see what it has in store for me.

Tuesday, February 15, 2011

Daily/Weekly Routine - Adding On

Somehow even though I kept up with the weekly tasks I set for myself it wasn’t until last night that I had realized that I didn’t pick out any new ones to start on this week.  I had some ideas of what I wanted to add in, but I didn’t sit down and actually list them out, so they slipped my mind.

I debated if I wanted to start them mid week, or if I wanted to put it off until next week.  While I’d love to put them off until next week, I’m thinking this would be a good time to work on the not procrastinating thing.

Daily Goals:
Make the bed every morning
Keep the bathroom sink cleaned off
Stay on top of the dishes
Dry and put up clean dishes *new*
Clean off the cabinets and bar top nightly *new*
Prep breakfast the night before *new*
Take vitamins and fish oil pills *new*


Weekly Goals:
Make a Menu Plan and try to follow it
Sweep the floor 2-3 times
Dump small trash cans once a week *new*
Take trash straight to the dumpster when it is ready to go out *new*

Additional things I would like to work on this week:
Priming the Dining Room
Typing up the freezer list

I am off to make me a spreadsheet check list, so I can keep track of them.  Maybe checking them off will help me remember to do them. 

Single Girl Cooking Tips - The Freezer

I love cooking!  Always have, and when I first learned to cook it was for 5-6 people.  Not a big deal, until you move out and cook for one.  This also isn’t that huge of a deal except it usually costs more to buy smaller packages of foods and even when you suck it up and buy the 1lb thing of meat, you still have four or more servings of food to deal with.  Over the last few years I’ve figured out a few things that help me with that, and I decided to share some of those things.

Single girl cooking tip #1:  The freezer is your friend!   
There are many things that freezer well which means you don’t have to eat the same food for 4-5 days.  The key is how you package them.  Instead of throwing a whole big bowl of soup in the freezer break it up in to actual portion sizes.

Single girl cooking tip #2:  Plastic bags are your friends as well.
You can also use plastic containers.  I prefer plastic bags because they seem to take up less room in the freezer.  Plus I have had several plastic bowls fall out of the freezer and break really easy.

Single girl cooking tip #3:  Things can be used different ways to give you different-ish meals.

When we finished making the Homemade Raviolis I had left over mushroom and cheese filling.  Instead of making more ravioli dough I decided to cook some jumbo shell pastas I have had.  I added some spinach to the mushroom/cheese then filled the shells.  I bagged them in ‘single girl’ portions, then put all of those in a freezer plastic bag that was labeled.


I had some of the Spinach Cheese Cream Sauce left over so I froze it.  I’m not sure yet how it will reheat, but sometime you have to do trial and error.  I also have spaghetti sauce bagged up in the freezer that I can use on top of the shells as well.


When I am ready to cook the shells I will put them in a small oven proof bowl, top with sauce and bake until hot and bubbly.

Monday, February 14, 2011

Menu Plan - Feb 14

I didn’t quite master the whole ‘bring my lunch to work’ thing last week.  There was only one day that I did not eat fast food.  I probably won’t do that good with it this week either, but I went ahead and listed out some things, that way if I do talk myself into doing it, I have a game plan ready to go.

Linking up to OrgJunkie.com again this week.  If you need meal idea of what to share your own, check it out!


Breakfast:
Breakfast burrito with yogurt
Bagel Thin with cream cheese, cheese stick and apricots
Bagel Thin with honey/peanut butter and grapes
Toast with yogurt and cheese stick
Bagel Thin with ham and cheese
Cereal or Oatmeal with apple sauce*

Lunch:
Tuna salad with crackers and grapes
Left over Homemade Raviolis with salad
Turkey Sausage Sandwich with grapes
Ranch Chicken Salad or wrap

Dinner:
Salisbury Steak with mac & cheese,* leftover veggies plus spinach & strawberry salad 
Turkey Meatloaf* with mashed potatoes* and zucchini
Cabbage & Turkey soup*
Beef & Gravy* with rice* and broccoli and cauliflower
Tilapia** with squash casserole** and cucumber and tomato salad
Omelet with mushrooms/onion/bell pepper* plus spinach with toast and gapes

*   In the freezer, cooked
** In the freezer, needs cooking

Sunday, February 13, 2011

A Weekend Recap


Well another weekend has come and gone.  Oh how I wish I could brag about all these wonderful things I had gotten done, but my weekend hasn’t gone as planned at all.  Not always a bad thing, though it can be a little frustrating.

I am taking a step back and remind myself that while I may not have crossed off everything from my weekend goals list, I still got some things done and I did a couple things for myself. 

Friday Night:
- I did get my menu plan for next week done on Friday night.  I‘ll need to tweak it a little to add in some leftovers.

- I did make out my grocery list.

Saturday:
- I did go to Walmart, and managed to get everything on my list this time, plus I bought me some tulips (pictured above).

- I did clean out the fridge, really cleaned out the fridge.  As in pulled out all the shelves, washed them, and threw out bottles of stuff that were out of date, cleaned out the fridge.

- I did spend time in the kitchen with the nephew making yummy homemade raviolis.  And we kept up with the dishes as we worked.

- I did wash, dry and fold a load of towels, as well as washed and dried a load of clothes, though I still need to hang them up.

Sunday:
- I did remove everything from three and a half cabinets in the kitchen, then rearranged/organized them.  I also added a few more things to the garage sale pile.

- I did take some time out to pamper myself by painting my toe nails.

- I did go on a date.

Even though I didn’t do anything on my big project of getting the dining room ready to paint, I did accomplish some little projects that I had on my to my list.  I’m calling this weekend another success, maybe a minor one, but a success none the less.

Saturday, February 12, 2011

Homemade Raviolis

Weekend Cooking Adventures

Let me first say thank you to K&R+X’s for the warm welcome and comment on my first Menu Plan link up at orgjunkie.com.  I had visited Kate’s blog and she was kind enough to share with me a recipe for making homemade noodles.  I thought they sounded good, and had decided to give them a try. 

The homemade pasta/ravioli tutorial she shared with me was great.

My nephew was planning on spending the night with me this weekend and he had already requested some raviolis with ‘red and white’ sauce, so when I saw the tutorial, I thought why not.  I knew it could be a challenge trying something totally new while having a helper, but I figured we would work it out.  I printed out the tutorials and made him sit down and read it before we even got started.  That helped, since he had a heads up on what we were doing.

The only issue we had was the actual mixing of the dough, it just wasn’t coming together, but I went ahead and added the water and oil and after some kneading it looked better. 

What I learned:

The kiddo is really good at putting the dough through the pasta roller.


I started filling and making the raviolis as he was thinning out the dough, which saved us time.  I think if I was to do this in the future alone, I would thin one ball, then just go ahead and fill that strip of them.  We tried stacking the strips, but then they were sticking to each other.

I used a heart cookie cutter this time, since it was almost Valentine’s Day (also an idea from the above site).  Next time I will do rounds or squares because I think I could get more out of them.  Of course I could have probably gotten the hearts closer, but with the odd shape I had issues.  We tried to reuse dough, but since it had extra flour on it (to keep it from sticking) it didn’t work as well.


Put the water on to boil when you finish the raviolis at the beginning of the 30-60 min wait time, not after it.  Why does water seems to take forever to boil when you are the most hungry?


Don’t forget that because there is a 20ish min wait after making the dough and the 30-60 min wait after making the raviolis that you want to start way earlier than you think you need too.  I wasn’t worried about time because it was just me and him eating, but it ended up taking us about 2.5 hours from when we first pulled out the flour to when we got to sit down and eat dinner.

We will definitely make these again, playing with fillings and sauces, though both recipes were very good!


Thursday, February 10, 2011

Just another Thursday, right?

This has just been one of those weeks.  Every day felt like it was a different day.  I’m not sure if it is back lash from last weeks work schedule or what.  On top of that I’ve on been one of those emotional roller coasters.  I’m pretty sure I can place where the mood is coming from, I just don’t know what to do about it other than just ride it out.

I just wasn’t in the mood to really do anything this week, so I didn’t.  That frustrates me because I think about the time I wasted not doing the things on my list, especially after I had such a productive week last week.  I can either sit here and dwell over the lost time or move on.  I’m working on the moving on part.

I did keep up with those three daily items to do.  I also swept most of the house tonight, so that’s another check for me.

Even though I was so not feeling it, I taped around most of the baseboards in the dining room and I put down some card board.  After that was done I talked myself into opening a can of primer and got a coat on one wall of paneling before calling it a night.  It wasn't much, but at least it was something. 

The dining room transformation is really finally underway.  Now lets just see how long it takes me to finish it.

Wednesday, February 9, 2011

A January Project: The Craft ‘Chest’

I wish I was a natural ‘out of the box’ thinker, but I’m not.  Thankfully, there are people out there that are.  And they are people that are kind enough to share their ideas.

I had seen some ideas online that use pieces of furniture for different things than they were made for.  Use a dresser for something other than clothes?  What a great idea! Since I had a piece of furniture, that I picked up at a garage sale 6 years ago, currently sitting in my house that I didn’t need for what it was meant to be used for, but I did need some extra storage. 

When I put everything back into the cake room / all purpose storage area, I had decided that it would be nice to separate craft/office type supplies from cake supplies.


The three boxes on top of the Chest of Drawers in the above picture, as well as the boxes on the table in the picture below are the items I had separated out that needed new homes.


Armed with some dollar store plastic containers I set about grouping things together.  It is really amazing how many rolls of tape or bottles of glue you find when you start putting them all in one place. 

I arranged and rearranged and ended up with this...


The Craft ‘Chest’ ended up being full when I got done.  While I would have loved to have some empty space in it, I decided not to stress over it.  As I sorted through the rest of the stuff in the house I’d have more to go it in, and when I got to that point, I’d re-evaluate everything in it.  My goal on the second look through will be to put more items from it into the garage sale pile.

While I only had one container of garage sale stuff in the end this time, I’m still happy to see all those empty containers behind it.  That makes me fell good, that at least the items that were in them are nicely organized in one place, and I don’t have to dig through several boxes to find things.  The two smaller boxes are on the right were odd stuff that didn’t end up fitting in with the craft stuff.  I’m working on homes from them.


I wanted to try the Chest of Drawers out with its new purpose in mind, before I got all into beautifying it.  If it works out well for me, then in the future I will consider giving it a paint job.  For now I’m perfectly fine with the way that it looks.

Tuesday, February 8, 2011

A January Project: The Cake Room

Well the Cake Room / General All Purpose Storage Room that is.

I do cakes as a hobby, but I also teach cake decorating classes at a local craft store.  This room has been pretty much a storage area for all things cake that I have collected over the last 10 years, and crafts/odds and ends, and the stuff I just haven’t known what to do with.

Back in the fall, it was decided that all the floors in the house would be replaced.  At that point I started cleaning this room up and putting some things in the garage sale pile.  I didn’t get a picture then, but I did remove several things from the room, including a large number of cake pans.

The floor replacement actually started on Jan 10th, and consisted of having to pack up all the rooms and move everything from one room to another while they pulled up carpet and laid new floors.

The below pictures are what I was left with from the fall clean out.  Like a lot of my projects I got stalled in the middle, and left everything as was. 

These are cell phone pictures, so the quality isn’t great.  At the time I did this, I didn’t know I’d be starting a blog.  I just wanted the pictures for my reference so I could see the difference.


The first is standing in the door way and then the pictures go counter clockwise from there. And yes those are four big 48x72x18 shelving units in this room. Plus the picture doesn’t quite show everything. There is a stack of boxes about waist high to the left side of the white shelving unit.

This is the empty room, after the new floor was put down.  Ahhh, a blank slate!


And this one, well this one is almost all of the cake stuff moved into my kitchen. It really doesn’t show the full scoop of things either. There were literally things piled and stacked from my fridge to the washer and drier. I even had boxes on top of the washer and drier.


I’m sharing this picture, because this was a little of my decluttering efforts. What cracks up me most about this picture?   Well my best friend’s daughter just turned 4. I’ve done all but this year’s cake, and I bought candles the last three years for the cake. And for any other of the number combinations, I’d have to wait two to three years to use them. Considering these have been in a box for probably at least 6 years, I decided it was time they go and when the time comes I’ll just buy new candles. Because really, am I going to remember I have them?


This is another decluttering of mine. The boxes are full of cookie cutters.  The bigger stack on the left would be the ‘to keep’ pile, but at least I was able to let go of about a third of it. That’s progress for me, especially when I didn’t think I’d get rid of any of them when I first started opening the boxes. I still have candy molds to sort through, but because I was able to condense down a lot, and I was already drained I decided that they could wait for another time.


And now… (You may want to go back up and look at the before pictures just for a moment.)
 

The white file boxes in the corner of the two shelving units are the candy molds that I need to go through. There are also some boxes that are on one of the shelves I’ll need to sort through as well.

Now I’d love to tell you that the other side of the room looked like this… 

  But then I’d have to be honest and show the other two pictures…


These two pictures show the rest of the stuff that came out of the room, that would need to go back in there or somewhere else.

At least 4 of the plastic containers (two tall and two skinny) were moved out to my storage building. I’m not sure if they are there to be stored or if I’ll put them on the garage sale side. But for now they are not in my house.

The metal boxes, there are two that size, and smaller ones inside of them, which are my cake travel boxes are also out in the storage room. I don’t want to get rid of them, but I won’t need them until the next convention I go to, which won’t be this year.

So this is the other side of the room now…


The boxes stacked in the corner are 3d or shaped cake pans. Most of the other boxes are papers, magazines and books. I’ll go through them and scan what I want to keep then get rid of the books. Right now, I have too many other things going on to worry with it. It’ll be nice to clear it out and have more free space. And the items from the Wilton tool box/Castle cake set and the 4 boxes to the left are items that I plan to use as give a ways for my students.

The only cake related items that were missing from these pictures are my two rolling tool boxes,
Wilton tool caddy and my bag, all of which are class stuff.
When the room was finished that day, there was also one wall that just two boxes of lids for various plastic containers.  My ‘craft storage’ has since been put on this wall.  And well to be honest other items have been moved into the room from the dining room clean out.  My Grandma’s Wedding China and all my vases/candle holders have been placed in here for safe keeping, for now.

 
I have two rows of empty plastic containers.  Some of these containers were used for the hallway/bathroom projects and also for the ‘craft storage’ (pictures coming soon for that project).


Since the fall quite a few items have come out of this room.  They have either been thrown away or put in the garage sale pile, so I really don’t have a clear idea of how much has left the room vs what stayed. My main objective was to get it cleaned out and organized, so I really haven't kept a tally while I was working on it.

I do know that by looking around the room that it definitely has less in it, especially randomly piled up. I also feel less stressed when I enter the room.

I did learn one lesson.  Do not use removable labels on plastic containers. They just don’t stay stuck.